Tyson Chicken Nuggets are a beloved convenience food, offering ease and flavor. Proper cooking ensures safety and taste. This guide provides detailed methods and tips for crispy, delicious results every time.
Overview of Tyson Chicken Nuggets
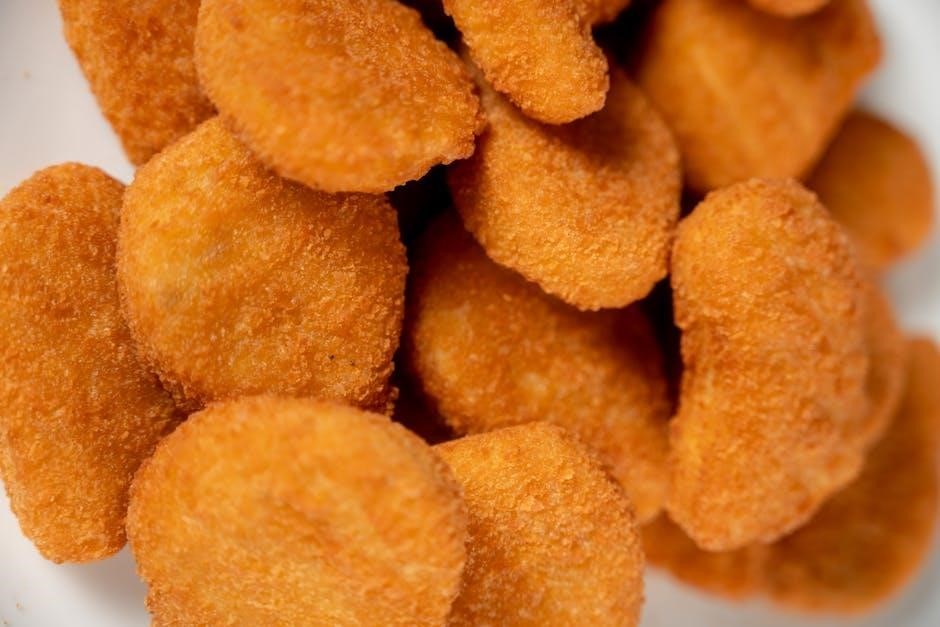
Tyson Chicken Nuggets are a popular convenience food made from white meat chicken, offering a tasty and easy meal solution. They come in various forms, including frozen and ready-to-cook options, making them a staple in many households. Known for their crispy exterior and juicy interior, Tyson Nuggets are versatile and can be prepared using multiple cooking methods. With no added hormones, they cater to health-conscious consumers while maintaining great flavor. Their widespread availability and ease of preparation make them a favorite for both kids and adults, ensuring a quick and satisfying meal any time of day.
Importance of Proper Cooking Instructions
Proper cooking instructions are crucial for ensuring the safety and quality of Tyson Chicken Nuggets. Undercooked nuggets can pose health risks, while overcooking may lead to a tough, dry texture. Following recommended guidelines ensures even cooking, retaining juiciness, and achieving the perfect crispiness. Adhering to cooking times and temperatures also prevents foodborne illnesses. By following instructions, you can avoid common mistakes and enjoy a delicious, hassle-free meal. Proper preparation enhances flavor and texture, making it essential for a satisfying dining experience. Always refer to the package or trusted sources for accurate cooking methods.
Understanding Tyson Chicken Nuggets
Tyson Chicken Nuggets are a popular, convenient food choice, offering great taste and versatility. They come in various forms, catering to different preferences and dietary needs, ensuring a satisfying meal. Tyson nuggets are made from high-quality ingredients, providing consistent flavor and texture. Their pre-cooked or frozen options make them easy to prepare, fitting into busy lifestyles. Whether for kids or adults, Tyson nuggets are a crowd-pleaser, offering a delicious and hassle-free dining experience. Their versatility allows for endless meal possibilities, from snacks to full meals, making them a staple in many households. They are widely available and trusted for their quality, making them a go-to choice for many families. Tyson nuggets also cater to health-conscious consumers with lean protein options, ensuring a balance between taste and nutrition. With their long shelf life and easy storage, they are a practical choice for meal planning. Tyson continuously innovates to meet changing consumer preferences, offering new flavors and cooking methods. Their commitment to quality and safety ensures that every nugget meets high standards, providing peace of mind for consumers. Tyson Chicken Nuggets are a testament to convenient, enjoyable, and nutritious meal solutions for modern living. They are a favorite in many cuisines, offering a versatile base for creative recipes. Tyson’s dedication to excellence has made their nuggets a trusted name in the food industry, delivering satisfaction with every bite. With their wide range of products, Tyson caters to diverse tastes and dietary requirements, ensuring there’s something for everyone. Tyson Chicken Nuggets are more than just a meal; they are a reliable and enjoyable solution for everyday dining.
Ingredients and Nutritional Information
Tyson Chicken Nuggets are made from white meat chicken, offering a lean protein source. Each serving provides approximately 11-15g of protein, depending on the variety. They contain no added hormones or steroids, ensuring a cleaner ingredient profile. A 3-ounce serving typically has around 150-200 calories, 3-4g of fat, and 350-400mg of sodium. Some varieties may include breading or seasonings for flavor. Tyson nuggets are free from artificial flavors and preservatives in certain lines. They are gluten-free but may contain allergens like soy or wheat due to breading. Always check the packaging for detailed nutritional facts and allergen warnings;
Forms and Varieties of Tyson Chicken Nuggets
Tyson Chicken Nuggets come in various forms to suit different preferences and dietary needs. Popular varieties include Original, Baked, and Air Fried options, each offering distinct textures and flavors. The nuggets are made from white meat chicken, ensuring tender and juicy bites. Some varieties are lightly breaded for crispiness, while others are unbreaded for a cleaner option. They are available in different sizes and shapes, such as nuggets, tenders, and bite-sized pieces. Tyson also offers gluten-free and low-sodium versions, catering to specific dietary requirements. These versatile forms make Tyson nuggets a convenient choice for diverse cooking methods and meal plans.
Allergens and Dietary Considerations
Tyson Chicken Nuggets may contain allergens such as wheat, soy, and milk, depending on the variety. Always check the packaging for specific allergen information. For those with dietary restrictions, Tyson offers gluten-free and low-sodium options. The nuggets are made with white meat chicken and do not contain added hormones, making them a suitable choice for health-conscious consumers. However, individuals with severe allergies should exercise caution and verify ingredients. Proper handling and cooking also ensure safety for all dietary needs, providing a versatile option for various lifestyles and preferences.
Cooking Safety and Precautions
Always handle Tyson Chicken Nuggets safely, ensuring proper handwashing and separation from raw foods. Cook to an internal temperature of 165°F to avoid foodborne illness. Follow storage guidelines to maintain freshness and prevent contamination. Thaw frozen nuggets safely in the refrigerator or cold water. Avoid cross-contamination by using clean utensils and surfaces. Proper cooking and handling ensure a safe and enjoyable dining experience for everyone.

Handling and Storage Tips
Proper handling and storage of Tyson Chicken Nuggets are crucial for maintaining quality and safety. Store frozen nuggets at 0°F (-18°C) or below to preserve freshness. When thawing, place them in a sealed container in the refrigerator to prevent moisture absorption. Avoid refreezing once thawed. Always use clean utensils and surfaces to handle nuggets to prevent cross-contamination. Cooked nuggets should be refrigerated within two hours of cooking and consumed within 3–4 days. Never wash nuggets before cooking, as this can splash bacteria onto surfaces. Proper storage and handling ensure food safety and optimal flavor.
Food Safety Guidelines
When cooking Tyson Chicken Nuggets, always follow food safety guidelines to ensure a safe dining experience. Cook nuggets to an internal temperature of 165°F (74°C) to eliminate harmful bacteria. Avoid cross-contamination by using separate utensils and surfaces for raw and cooked nuggets. Wash hands thoroughly before and after handling. Never thaw nuggets at room temperature; instead, thaw in the refrigerator or under cold running water. Refrigerate or freeze cooked nuggets promptly after cooking. Adhere to Tyson’s packaging instructions for storage and reheating to maintain quality and safety.
Avoiding Common Cooking Mistakes
- Overcrowding: Avoid overcrowding pans or trays, as this leads to uneven cooking and steaming instead of browning.
- Incorrect Temperature: Always preheat ovens, air fryers, or pans to the recommended temperature for crispy results.
- Ignoring Instructions: Follow Tyson’s package guidelines for cooking times and methods to prevent undercooking or burning.
- Not Patting Dry: Pat nuggets dry before cooking to enhance crispiness and avoid sogginess.
- Overcooking: Don’t overcook, as this can make nuggets dry. Use a timer and check internal temperature.
Cooking Methods
Tyson Chicken Nuggets can be cooked using various methods, including oven, microwave, air fryer, pan, or deep fryer. Each method offers a unique texture and flavor profile.
Oven Cooking
Oven cooking is a popular method for Tyson Chicken Nuggets, offering a crispy exterior and juicy interior. Preheat your oven to 400°F (200°C). Place the frozen nuggets on a baking sheet lined with parchment paper in a single layer. Bake for 10-12 minutes, flipping them halfway through for even cooking. Ensure the internal temperature reaches 165°F (75°C) for food safety. This method provides a balanced texture without extra oil, making it a healthier alternative to frying. Always follow the package instructions for best results and crispy outcomes.
Microwave Cooking
Microwave cooking offers a quick and convenient way to prepare Tyson Chicken Nuggets. Start by placing 2-3 nuggets on a microwave-safe plate lined with a paper towel. Cook on high for 20-25 seconds per nugget, adjusting time based on your microwave’s power. Check for an internal temperature of 165°F (75°C) to ensure food safety. Be cautious of overheating, as this can dry out the nuggets. For even cooking, flip them halfway through. This method is ideal for a fast snack but may not achieve the same crispiness as oven or pan cooking. Follow package guidelines for optimal results.
Air Fryer Cooking
Air fryer cooking is a popular method for Tyson Chicken Nuggets, offering crispy results with less oil. Preheat the air fryer to 400°F (200°C). Place nuggets in a single layer, ensuring they don’t overlap. Cook for 8-10 minutes, shaking halfway. For extra crispiness, increase time by 1-2 minutes. Check internal temperature reaches 165°F (75°C). Pat dry excess moisture before cooking for better texture. Avoid overcrowding the basket for even cooking. This method delivers a golden, crunchy exterior while maintaining juicy interiors, making it a healthier alternative to deep frying. Adjust timing based on nugget size and air fryer model for perfect results.
Pan Cooking
Pan cooking Tyson Chicken Nuggets is a quick and effective method for achieving crispy exteriors and juicy interiors. Use a non-stick skillet or pan over medium heat. Add a small amount of oil to prevent sticking. Once the pan is preheated, place the nuggets in a single layer, avoiding overcrowding. Cook for 5-6 minutes per side, flipping gently to ensure even browning. Cook until golden brown and the internal temperature reaches 165°F (75°C). Pat dry excess moisture before cooking for a crisper texture. This method provides a classic, satisfying crunch without the need for deep frying, making it a versatile option for any meal.
Deep Fryer Cooking
Deep fryer cooking offers a crispy texture for Tyson Chicken Nuggets. Preheat the fryer to 350°F (175°C). Place nuggets in a single layer without overcrowding. Cook for 4-5 minutes until golden brown. Avoid overcrowding to ensure even cooking. Remove and drain on paper towels. The result is a crunchy exterior and juicy interior. Since Tyson nuggets are pre-cooked, frying enhances crispiness without overcooking. Maintain oil temperature for consistent results. This method is ideal for achieving a restaurant-quality texture at home.
Oven Cooking Instructions
Preheat your oven to 400°F (200°C). Place Tyson Chicken Nuggets on a baking sheet lined with parchment paper. Bake for 10-12 minutes, flipping halfway for even cooking.
Preparation for Oven Cooking
Preheating your oven to 400°F (200°C) is essential for even cooking. Line a baking sheet with parchment paper or lightly grease it to prevent sticking. Place Tyson Chicken Nuggets in a single layer, ensuring they are evenly spaced for consistent results. Do not overcrowd the baking sheet, as this can lead to uneven cooking. If frozen, ensure nuggets are spread out to allow proper air circulation. Pat dry excess moisture with a paper towel for crisper texture. Follow package instructions for portion sizing to avoid undercooking or overcooking. Proper preparation ensures the best flavor and texture outcome.
Step-by-Step Oven Cooking Process
Preheat the oven to 400°F (200°C). Place Tyson Chicken Nuggets on a lined or greased baking sheet in a single layer. Bake for 10-12 minutes, flipping halfway for even cooking. Check for a golden-brown color and internal temperature of 165°F (75°C). Remove from the oven and let rest for 1-2 minutes before serving. Follow package instructions for precise timing and temperature. Ensure nuggets are crispy and fully cooked for the best taste and safety.
Tips for Optimal Oven Cooking Results
Preheat the oven to 400°F (200°C) to ensure even cooking. Line the baking sheet with parchment paper or lightly spray with non-stick spray to prevent sticking. Spread nuggets in a single layer for uniform crisping. Flip halfway through cooking for balanced browning. Avoid overcrowding the baking sheet to allow proper air circulation. Use a food thermometer to confirm an internal temperature of 165°F (75°C). Let nuggets rest for 1-2 minutes before serving to retain juiciness. For extra crispiness, pat dry excess moisture with a paper towel before baking. Consider marinating nuggets pre-cooking for added flavor; Always follow package instructions for best results.

Microwave Cooking Instructions
For quick results, Tyson nuggets can be microwaved. Place on a safe plate, cook 30-45 seconds per nugget on high, flip halfway, ensure internal temperature of 165°F for safety.
Preparation for Microwave Cooking
Before microwaving Tyson Chicken Nuggets, ensure they are frozen and properly placed on a microwave-safe plate. Arrange nuggets in a single layer, avoiding overcrowding. For even cooking, space them out evenly. Covering with a paper towel can help retain moisture. Cook on high power in short intervals, checking for doneness. Use a food thermometer to verify an internal temperature of 165°F. Flip nuggets halfway through cooking if necessary. Pat dry excess moisture before cooking for crispier texture. Always follow package instructions for precise timing and safety. Proper preparation ensures optimal flavor and texture in microwave cooking.
Step-by-Step Microwave Cooking Process
Set microwave to high power. Place Tyson nuggets on a microwave-safe plate in a single layer. Cook for 30-45 seconds per side for 3-4 nuggets. For 6-8 nuggets, cook 1-2 minutes. Check nuggets after each interval to avoid overcooking. Use a food thermometer to ensure internal temperature reaches 165°F. Let nuggets stand for 1 minute before serving. Always follow package instructions for precise timing and safety guidelines. Adjust cooking time based on nugget quantity and microwave wattage for optimal results. Proper microwaving ensures tender and evenly cooked Tyson Chicken Nuggets every time.
Tips for Optimal Microwave Cooking Results
For the best microwave results, spread nuggets evenly on a microwave-safe plate to ensure consistent cooking. Avoid overcrowding, as this can lead to uneven cooking. Cook in short intervals, checking nuggets frequently to prevent overcooking. Use a food thermometer to confirm an internal temperature of 165°F for food safety. If nuggets are not crispy enough, extend cooking time in 10-second increments. For crisper texture, lightly pat nuggets dry with a paper towel before cooking. Adjust cooking time based on nugget quantity and microwave power level. Covering with a paper towel can help retain moisture and promote even heating. Always follow package guidelines for optimal outcomes.

Air Fryer Cooking Instructions
Preheat the air fryer to 400°F (200°C). Cook Tyson nuggets in a single layer for 8-10 minutes, shaking halfway. Ensure internal temperature reaches 165°F for safety.
Preparation for Air Fryer Cooking
Preheating your air fryer to 400°F (200°C) ensures even cooking. Place Tyson nuggets in a single layer, leaving space for air circulation. Pat dry excess moisture with a paper towel to enhance crisping. Lightly spray with oil for crunchier results. Avoid overcrowding the basket, as this can prevent even cooking. Optional: Sprinkle with seasoning before cooking for added flavor. Proper preparation ensures crispy texture and prevents sticking, making your Tyson nuggets perfectly cooked every time;
Step-by-Step Air Fryer Cooking Process
Preheat the air fryer to 400°F (200°C) for 3-5 minutes. 2. Place Tyson nuggets in a single layer, ensuring space for air circulation. 3. Cook for 10-12 minutes, shaking halfway. 4. Check for internal temperature of 165°F (74°C). 5. Cook an extra 2-3 minutes if needed. 6. Remove and serve hot. This method ensures crispy nuggets with minimal effort, achieving perfect results every time without deep frying.
Tips for Optimal Air Fryer Cooking Results
For the best results, pat Tyson nuggets dry with a paper towel to remove excess moisture, enhancing crispiness. Avoid overcrowding the air fryer basket to ensure even cooking. Shake the basket halfway through cooking to promote uniform browning; Lightly spraying with oil can enhance crispiness but is optional. Monitor nuggets closely toward the end, as cooking times may vary. Use a food thermometer to confirm an internal temperature of 165°F (74°C). Serve immediately for the crispiest texture. Experiment with seasoning after cooking for added flavor. These tips ensure perfectly cooked, delicious Tyson nuggets every time.
Pan Cooking Instructions
Preheat a non-stick pan over medium heat, add a small amount of oil, and cook Tyson nuggets for 5-7 minutes per side until golden brown and crispy. Ensure not to overcrowd the pan for even cooking; Always check for an internal temperature of 165°F (74°C) for food safety; This method delivers a crunchy exterior and juicy interior, perfect for a quick and delicious meal.
Preparation for Pan Cooking
‘ section, which I can use as a reference.
Looking at the previous response, it included preheating the pan, adding oil, ensuring proper nugget distribution, thawing, and internal temperature checks. I need to make sure I cover all these points but in a way that’s concise and fits within .
Let me outline the key points to include:
Preheating the pan over medium heat.
Adding a small amount of oil to prevent sticking.
Ensuring the pan is hot before adding nuggets.
Arranging nuggets in a single layer without overcrowding.
Patting nuggets dry with a paper towel (if frozen).
Checking internal temperature reaches 165°F (74°C).
Mentioning the result: crispy exterior and tender interior.
Now, I need to structure these points into a coherent paragraph, making sure each step flows naturally into the next. I should avoid any unnecessary jargon and keep the language accessible.
I should also check the word count as I draft. Let me try to write it out, then count the words. If it’s over, I can find ways to condense without losing essential information.
Let me start drafting:
“Prepare Tyson Chicken Nuggets for pan cooking by first preheating a skillet or non-stick pan over medium heat. Lightly coat the pan with oil to prevent sticking. Once the pan is hot, carefully place the nuggets in a single layer, ensuring they are not overcrowded. If using frozen nuggets, gently pat them dry with a paper towel to remove excess moisture. This step helps achieve a crispier exterior. Always ensure the internal temperature reaches 165°F (74°C) for food safety. Proper preparation leads to a perfectly cooked nugget with a crispy outside and tender inside.”
Now, let me count the words. I’ll go through each sentence:
Prepare Tyson Chicken Nuggets for pan cooking by first preheating a skillet or non-stick pan over medium heat. ౼
Lightly coat the pan with oil to prevent sticking. ─
Once the pan is hot, carefully place the nuggets in a single layer, ensuring they are not overcrowded. ─
If using frozen nuggets, gently pat them dry with a paper towel to remove excess moisture. ౼
This step helps achieve a crispier exterior. ─
Always ensure the internal temperature reaches 165°F (74°C) for food safety. ౼
Proper preparation leads to a perfectly cooked nugget with a crispy outside and tender inside. ─
Total words: 17+8=25, +16=41, +15=56, +7=63, +11=74, +13=87. Hmm, that’s , which is under the 92-word limit. I need to add a few more words to reach the exact count. Maybe I can expand on one of the points or add an additional tip.
Perhaps I can mention the type of oil to use or emphasize the importance of not overcrowding. Alternatively, I can add a note about flipping the nuggets gently to avoid breaking them.
Let me revise:
“Prepare Tyson Chicken Nuggets for pan cooking by first preheating a skillet or non-stick pan over medium heat. Lightly coat the pan with a small amount of oil, such as vegetable or canola oil, to prevent sticking. Once the pan is hot, carefully place the nuggets in a single layer, ensuring they are not overcrowded, as this can affect even cooking. If using frozen nuggets, gently pat them dry with a paper towel to remove excess moisture, which helps achieve a crispier exterior. Always ensure the internal temperature reaches 165°F (74°C) for food safety. Proper preparation leads to a perfectly cooked nugget with a crispy outside and tender inside.”
Now, recounting:
Prepare Tyson Chicken Nuggets for pan cooking by first preheating a skillet or non-stick pan over medium heat. ─ 17
Lightly coat the pan with a small amount of oil, such as vegetable or canola oil, to prevent sticking. ─ 15
Once the pan is hot, carefully place the nuggets in a single layer, ensuring they are not overcrowded, as this can affect even cooking. ౼ 19
If using frozen nuggets, gently pat them dry with a paper towel to remove excess moisture, which helps achieve a crispier exterior. ─ 19
Always ensure the internal temperature reaches 165°F (74°C) for food safety. ౼ 11
Proper preparation leads to a perfectly cooked nugget with a crispy outside and tender inside. ౼ 13
Total: 17+15=32, +19=51, +19=70, +11=81, +13=94. Now it’s , which is over the limit. I need to trim it down. Maybe remove the specific oil types and combine sentences.
Revised version:
“Prepare Tyson Chicken Nuggets for pan cooking by preheating a skillet or non-stick pan over medium heat. Lightly coat the pan with oil to prevent sticking. Once hot, place nuggets in a single layer without overcrowding. Pat frozen nuggets dry with a paper towel to enhance crispiness. Ensure the internal temperature reaches 165°F (74°C) for safety. Proper preparation ensures crispy exteriors and tender interiors.”
Now, word count: 14+7+14+11+11+12 = . Still under. Perhaps add a bit more detail.
“Prepare Tyson Chicken Nuggets for pan cooking by preheating a skillet or non-stick pan over medium heat. Lightly coat the pan with oil to prevent sticking. Once the pan is hot, carefully place the nuggets in a single layer, ensuring they are not overcrowded, which is key for even cooking. If using frozen nuggets, gently pat them dry with a paper towel to remove excess moisture, helping to achieve a crispier exterior. Always ensure the internal temperature reaches 165°F (74°C) for food safety. Proper preparation leads to perfectly cooked nuggets with a crispy outside and tender inside.”
Counting again:
Prepare Tyson Chicken Nuggets for pan cooking by preheating a skillet or non-stick pan over medium heat. ౼ 17
Lightly coat the pan with oil to prevent sticking. ─ 8
Once the pan is hot, carefully place the nuggets in a single layer, ensuring they are not overcrowded, which is key for even cooking. ౼ 18
If using frozen nuggets, gently pat them dry with a paper towel to remove excess moisture, helping to achieve a crispier exterior. ౼ 19
Always ensure the internal temperature reaches 165°F (74°C) for food safety. ౼ 11
Proper preparation leads to perfectly cooked nuggets with a crispy outside and tender inside. ─ 13
Total: 17+8=25, +18=43, +19=62, +11=73, +13=86. Still . Maybe add a phrase about letting the pan heat up properly.
“Prepare Tyson Chicken Nuggets for pan cooking by preheating a skillet or non-stick pan over medium heat. Lightly coat the pan with oil to prevent sticking. Once the pan is sufficiently hot, carefully place the nuggets in a single layer, ensuring they are not overcrowded, which is key for even cooking. If using frozen nuggets, gently pat them dry with a paper towel to remove excess moisture, helping to achieve a crispier exterior. Always ensure the internal temperature reaches 165°F (74°C) for food safety. Proper preparation leads to perfectly cooked nuggets with a crispy outside and tender inside.”
Now, counting:
Prepare Tyson Chicken Nuggets for pan cooking by preheating a skillet or non-stick pan over medium heat. ─ 17
Lightly coat the pan with oil to prevent sticking. ౼ 8
Once the pan is sufficiently hot, carefully place the nuggets in a single layer, ensuring they are not overcrowded, which is key for even cooking. ౼ 20
If using frozen nuggets, gently pat them dry with a paper towel to remove excess moisture, helping to achieve a crispier exterior. ౼ 19
Always ensure the internal temperature reaches 165°F (74°C) for food safety. ౼ 11
Proper preparation leads to perfectly cooked nuggets
Step-by-Step Pan Cooking Process
Heat a non-stick skillet over medium heat and add a
Tips for Optimal Pan Cooking Results
For the best pan-cooked nuggets, ensure the skillet is hot before adding oil. Don’t overcrowd the pan; cook in batches if necessary. Cook evenly, flipping halfway. Use a thermometer to maintain medium heat. Pat nuggets dry before cooking for a crisper exterior. Avoid stirring too much to prevent breaking. Let nuggets rest briefly after cooking for juices to redistribute. Serve immediately for maximum flavor and texture. These tips ensure crispy, golden nuggets every time.

Deep Fryer Cooking Instructions
Preheat oil to 350°F. Fry nuggets in batches for 3-4 minutes until golden. Avoid overcrowding for even cooking. Drain excess oil for crispy results.
Preparation for Deep Fryer Cooking
Before frying, pat Tyson Chicken Nuggets dry with paper towels to remove excess moisture. This step ensures even cooking and prevents oil splatters. Heat the deep fryer to 350°F, using vegetable or peanut oil for optimal results. Avoid overcrowding the fryer basket; cook in batches if necessary. For extra flavor, lightly season the nuggets with your favorite spices before frying. Always handle hot oil with care and never leave it unattended. Keep paper towels ready to drain excess oil after frying for crispy, non-greasy results.
Step-by-Step Deep Fryer Cooking Process
Fill the deep fryer with 2-3 inches of vegetable oil and preheat to 350°F. Once heated, carefully add Tyson Chicken Nuggets in a single layer, avoiding overcrowding. Fry for 5-6 minutes, flipping halfway, until golden brown. Use a slotted spoon to remove nuggets and drain on paper towels. Serve immediately for the best texture. For extra crispiness, increase the oil temperature to 375°F during the last minute of frying. Always follow safety guidelines when working with hot oil to prevent accidents.
Tips for Optimal Deep Fryer Cooking Results
For ideal deep-frying results, ensure the oil reaches the correct temperature to prevent greasiness. Don’t overcrowd the fryer basket to allow even cooking. Pat nuggets dry with a paper towel before frying to enhance crispiness. Use a thermometer to maintain consistent heat. After frying, drain nuggets on paper towels to remove excess oil. Serve immediately for the best texture. Experiment with seasoning the nuggets post-frying for extra flavor. Always follow the manufacturer’s guidelines for safe deep frying to achieve perfect Tyson Chicken Nuggets every time.